The AssemblyItem and BuildAssembly requests
Integrated applications running on Premier and Enterprise editions can use the Desktop SDK to add assembly items (ItemInventoryAssemblyAddRq) and then “build” those assembly items (BuildAssemblyAddRq). Integrated applications running on Premier and Enterprise editions can use the SDK to add assembly items (ItemInventoryAssemblyAddRq) and then “build” those assembly items (BuildAssemblyAddRq).
Note
Note
If you are testing an application that uses assembly item and building assembly features, we recommend that you do not use the sample companies provided with QuickBooks. These sample companies have future dates in them that can yield unexpected results with regard to on hand quantities. You should create your own sample company with current dates.
We put “build” in quotations because the BuildAssembly transaction does not actually build the assembly, of course, but simply causes the accounting transaction that enables a business to track finished goods inventory and the component item inventory accurately.
Although the SDK ItemInventoryAssemblyAdd (available since SDK 2.0) and BuildAssemblyAdd (available starting in QuickBooks 2006) works only on Premier and Enterprise, your application may be able run on other editions of QuickBooks with inventory features if your application simply views, edits, sells, or reports on existing assembly items or BuildAssembly transactions. (The API Reference page lists the required SDK spec version required for each of these ItemInventoryAssembly* and BuildAssembly* requests.)
In order to use the SDK to add assembly items and build assemblies, you first need to know a few things about item assemblies in QuickBooks. So we’ll start off with some background information before getting into creating and building assembly items, along with modifying and querying for them.
An assembly item in QuickBooks is an inventory-tracked item made up of individual inventory items (inventory “parts” in the UI) and/or other assembly items as shown below. The items and/or assemblies that make up the assembly are called components. Note that all components of an assembly item must be defined in the QuickBooks company as inventory items or assembly items before you can use them in an assembly. (Services cannot be used as component parts.)

How many components can an assembly have? For Premier, an assembly can have a maximum of 100 components. For Enterprise, the maximum is 500 components.
To get an idea of how to add an assembly item in the SDK, take a look at how it’s done in the UI. The following figure shows the New Item form that allows the user to add a new assembly item. (You can get to the New Item form from the main QuickBooks menu bar by selecting Lists->Item List->Item->New.)

In the upper left of the form, notice the item type pulldown, where Inventory Assembly (assembly item) has been chosen.In the SDK you use the ItemInventoryAssemblyAdd request. Also notice that the Bill of Materials table lists the components of assembly item.
Adding an assembly item has no effect on inventory levels, since the assembly item simply serves as a definition that specifies how the assembly is to be built, which accounts are to be used, the sale price, and so forth.
Note
If you enter a quantity on hand in the New Item window while defining a new assembly item, this transaction is recorded as an inventory adjustment where assembly units are added to inventory but components are not deducted from inventory.
Notice that inventory permissions are required to add assembly items and build assemblies.
Inventory is not affected until you perform a Build Assembly transaction either via the QuickBooks UI or via the SDK BuildAssemblyAdd request. As a result of the build assembly transaction, the assembly item units are incremented in inventory and the component parts or component assemblies are decremented from inventory.
Adding new BuildAssembly transactions are supported in QuickBooks Premier and Enterprise. In the QuickBooks UI for these editions, you add a new BuildAssembly by clicking on the Build Assembly icon in the main navigator:

Clicking the icon displays the Build Assemblies form:

In the upper left, notice the assembly item pulldown, from which the user selects the assembly to build. In the figure, the Metal Panel Assembly has been selected. Notice that the quantity data about this item is automatically filled in on the form. The user supplies only the quantity to build, possibly also the build reference number (if the user doesn’t want the default number), the transaction date and any build notes in the Memo field.
The SDK provides functionality to duplicate most of the features on this particular form:
- BuildAssemblyQuery can be used in a selection list like the one here, with the quantity data (along with other data) returned in the query response for a selected assembly.
- ItemAssembliesCanBuildQuery returns the number of units you can build for the specified assembly.
- BuildAssemblyAdd causes the actual Build Assembly transaction to occur, once the required data is supplied.
However, if there are not enough components to build the quantities specified the UI lets you do a pending build, and in the SDK you can use the MarkPendingIfRequired to do the same thing. If you must use qbXML 6.0 or less because your application must work on versions of QuickBooks older than QB 2008, you can alternatively use the ItemAssembliesCanBuildQuery request before you attempt to invoke BuildAssemblyAdd.
Be careful when supplying your own Ref numbers when creating or editing the BuildAssembly. QuickBooks does not prevent the same Ref number from being assigned to more than one BuildAssembly.
In the QuickBooks UI, you have the option of creating a pending build if there aren’t enough components in inventory to build the assembly in the quantities specified.
Beginning with qbXML 7.0 and QuickBooks 2008, you can also do this via the SDK using the MarkPendingIfRequired.
If you don’t use MarkPendingIfRequired and you invoke BuildAssemblyAdd with a quantity that would exceed the on-hand quantities of any component, you get a status code error of 3370 and a status message indicating that there are insufficient components for the request.
You will get the same status code error 3370 if you attempt to use BuildAssemblyMod to remove the pending status from a pending BuildAssembly transaction (created via the UI) if you lack sufficient component quantities, because this is effectively performing a BuildAssembly.
There are circumstances where even a finalized BuildAssembly transaction can be changed into a pending transaction by other activities in QuickBooks, whether from the UI or from the SDK.
Finalized builds change to pending whenever the quantity of at least one component drops below the quantity needed to build the specified number of assemblies on the build transaction date.
This means that if a QB user or integrated application changes past inventory quantities or the dates of purchase orders, invoices, or sales receipts in ways that result in QuickBooks built assemblies lacking sufficient components on the build date, the affected assembly builds would change from finalized to pending.
Assembly definition details, such as the list of and quantity of components, can be modified at any time either in the UI or via the SDK. If an assembly item is modified while there is a pending build for that assembly, at the time when the pending build is actually built QuickBooks prompts the user to build either with the most recent assembly definition or with the definition that is currently in effect for that build.
Keep in mind that such modifications to the assembly (revision history) is not tracked; if you need to build a previous version of an assembly, you need to modify the assembly again to reflect the desired component list. One feature that can help you reconstruct a previously used assembly item is to look up a past BuildAssembly transaction (BuildAssemblyQuery in the SDK) and use the component list from that transaction. The component list for the transaction is saved even if the assembly item’s component list is changed subsequent to the BuildAssembly transaction. However, this approach requires the QuickBooks user or the integrated application to note and keep track of whichever BuildAssembly transaction (and thus its component list) is important for revision history purposes.
Finally, keep in mind that changing quantity on hand for assemblies adjusts the overall number of assembly units in inventory, but it does not change the quantity on hand of components (inventory part items or assemblies) used in the parent assembly.
If a QB user or application attempts to sell via sales receipt or invoice more assembly units than are available in inventory, the UI behavior varies slightly from the SDK. In the UI, the user is warned that quantities are insufficient to fulfill the order: the user can respond by accepting or cancelling. In the SDK, the SalesReceiptAdd or InvoiceAdd simply adds the SalesReceipt or Invoice without the warning. But for both SDK and UI (assuming the UI user opts to continue with the transaction), the quantity on hand for the specified assembly changes to a negative value.
Note
Note
NOTE: When assembly items appear on a UI form (for example, a sales receipt or an invoice) or a report, their component items are not displayed. Only the assembly name, description, and price are displayed.
Notice that if you modify the component list of an assembly and build that assembly while you still have a quantity of a previous version in stock, QuickBooks cannot distinguish between these two versions at the time you make a sale. The typical recommendation is to either sell out of one version before building another version, or “disassemble” the on hand inventory of the previous build. We’ll show you how to do that shortly.
Either approach enables a QB user or integrated application to track the versions by the sale date, if the user or application keeps track of this date.
As noted previously, in some instances you may need to disassemble inventory assemblies, for example, if you are changing the component list and want to maintain only one version of the assembly in inventory.
There are several ways to disassemble inventory assemblies and return component items to inventory.
You can:
- Open the build transaction that built the assembly you want to disassemble and reduce the quantity to build in the Build Assemblies window. The result is the same as if you had only built the smaller number of assemblies in the first place. The quantity of assembly units in inventory decreases, and the quantity of component inventory parts is increased accordingly.
Note: Build transactions with changed amounts will display on the audit trail report.
- Adjust Quantity/Value on Hand for each assembly component and the assembly item.
- Delete the build transaction. The quantity of assembly units in inventory is decreased and the quantity of component inventory parts is increased accordingly. This method completely removes the build transaction from QuickBooks and should not be used if you want to maintain a record of the transaction.
In the SDK, you can do the following
- Add and modify item assembly definitions
- Add build assembly transactions
- Query assembly definitions
- Generate assembly reports
Examples of these actions are provided below.
The API Reference page for the ItemInventoryAssemblyAdd request message is shown below:

The qbXML tags for ItemInventoryAssemblyAdd provide the same functionality as the UI’s New Item form for assembly items. Most of these are straightforward: Name maps to the UI’s Item Name/Number, IsActive maps to the UI’s Item is Inactive checkbox, BuildPoint, QuantityOnHand, TotalValue, InventoryDate map to the Build Point, On Hand, Total Value, and As Of values in the UI, respectively.
Some other SDK elements might need a bit more explanation, so we’ll describe some of the less obvious elements in the following sections.
The ParentRef in the qbXML for adding an assembly item is the equivalent of the Subitem Of checkbox and its related item pulldown menu, which is activated when the user checks the checkbox. The difference is that the ParentRef (containing either the ListID or the FullName of the parent assembly) represents the choice of a parent assembly as well as the choice to make the new assembly a subitem of another assembly in the first place.
What is a subitem? It is simply a way to include your assembly in an assembly hierarchy that you want to be visible in QuickBooks lists and reports. For example, if you want the QuickBooks item list to display a main item listing of “Alpha Airplane Kit” with subitems of “Wings”, “Engine”, “Rudder” and so forth you would make the Wings assembly a subitem of Alpha Airplane Kit, the Engine assembly a subitem of “Alpha Airplane Kit, and so forth. The next figure shows making assemblies visible as hierarchies in QB Lists,

The main point to keep in mind is that checking “Subitem Of” or the (SDK equivalent ParentRef) is strictly used for list and report visibility purposes, to show logical arrangements of assemblies that, to QuickBooks, are otherwise internally unrelated assemblies. It does NOT make your new assembly a component of the another assembly. (We’ll show you how to do that shortly.) Your BuildAssembly of the parent assembly will not result in the building of any subitem assemblies.
The “I purchase this…from a vendor” checkbox is used if you have an assembly item you normally build, but occasionally need to purchase from a vendor, for example if you are short quantities of that assembly and need to acquire more quickly.
If you supply any one or any combination of the PrefVendorRef, the PurchaseDesc, or the PurchaseCost tags, you cause the same thing to happen in QuickBooks as occurs in the UI when a user checks the “I purchase this assembly item from a vendor” checkbox.
When the user does this in the UI, a frame appears that allows the purchase cost, purchase description, and preferred vendor to be specified. The tags already mentioned in the preceding paragraph allow you to fill out this same information in the SDK. Notice that you need not supply the purchase cost when you create the assembly item, since it can be added later when you receive the actual cost.
The following example shows how to create a new assembly item. In the listing, the assembly named Widget G has a component list of the two existing items (Lrge Bolt and Lrge Nut) listed under the two ItemInventoryAssemblyLine tags. Our sample happens to use the optional sales tax tag and the default COGS account.
1 2 3 4 5 6 7 8 9 10 11 12 13 14 15 16 17 18 19 20 21 22 23 24 25 26 27 28 29 30 31 32 33 34 35 36 37 | <?qbxml version="5.0"?> <QBXML> <QBXMLMsgsRq onError = "stopOnError"> <ItemInventoryAssemblyAddRq requestID = "2"> <ItemInventoryAssemblyAdd> <Name>Widget G</Name> <SalesTaxCodeRef> <FullName>Tax</FullName> </SalesTaxCodeRef> <SalesDesc>Misc Widgets</SalesDesc> <SalesPrice>10.00</SalesPrice> <IncomeAccountRef> <FullName>Sales Income</FullName> </IncomeAccountRef> <COGSAccountRef> <FullName>Cost Of Goods Sold</FullName> </COGSAccountRef> <AssetAccountRef> <FullName>Inventory Asset</FullName> </AssetAccountRef> <BuildPoint>10</BuildPoint> <ItemInventoryAssemblyLine> <ItemInventoryRef> <FullName>Lrge Bolt</FullName> </ItemInventoryRef> <Quantity>2</Quantity> </ItemInventoryAssemblyLine> <ItemInventoryAssemblyLine> <ItemInventoryRef> <FullName>Lrge Nut</FullName> </ItemInventoryRef> <Quantity>2</Quantity> </ItemInventoryAssemblyLine> </ItemInventoryAssemblyAdd> </ItemInventoryAssemblyAddRq> </QBXMLMsgsRq> </QBXML> |
The next example shows a procedure that opens a connection with QuickBooks, adds an assembly item to the currently open company, shows the results, and closes the connection.
The sample is straightforward except for one tricky part, which is appending the component items in the line item object as per the following lines:
1 2 3 4 5 | Dim AssemblyLineItem As IItemInventoryAssemblyLine 'Append each line item of the component list separately. Append returns 'the line item object, which you then set with the values you want Set AssemblyLineItem = ItemAssemblyAdd.ItemInventoryAssemblyLineList.Append |
Notice that the Append method returns the line item object, which you then fill its key fields ItemRef and Quantity. What happens if you were to try it this way:
1 2 | ItemAssemblyAdd.ItemInventoryAssemblyLineList.Append.Quantity.setValue(2) ItemAssemblyAdd.ItemInventoryAssemblyLineList.Append.Quantity.setValue(2) |
You’ll get a runtime error because you just added two line items to the list, one of which has a valid ItemInventoryRef, and one that doesn’t–with the faulty line having only a Quantity field. If you were print out the XML from this faulty attempt (using ToXMLString on the IMsgSetRequest object), here’s what the resulting bad XML would look like:
1 2 3 4 5 6 7 8 | <ItemInventoryAssemblyLine> <ItemInventoryRef> <FullName>Big Bolt</FullName> </ItemInventoryRef> </ItemInventoryAssemblyLine> <ItemInventoryAssemblyLine> <Quantity>2</Quantity> </ItemInventoryAssemblyLine> |
which won’t work at all. Instead, as shown below, what you need to do is invoke Append on the Line Item list with the Append method returning the line item object. Then just set the ItemRef and Quantity properties on that line item.
1 2 3 4 5 6 7 8 | Dim AssemblyLineItem As IItemInventoryAssemblyLine
'Append each line item of the component list separately. Append returns
'the line item object, which you then set with the values you want
Set AssemblyLineItem = ItemAssemblyAdd.ItemInventoryAssemblyLineList.Append
AssemblyLineItem.ItemInventoryRef.FullName.setValue ("Big Bolt") AssemblyLineItem.Quantity.setValue (2)
Set AssemblyLineItem = ItemAssemblyAdd.ItemInventoryAssemblyLineList.Append
AssemblyLineItem.ItemInventoryRef.FullName.setValue ("Big Nut") AssemblyLineItem.Quantity.setValue (2) '
|
The next example shows adding assembly Items in QBFC
1 2 3 4 5 6 7 8 9 10 11 12 13 14 15 16 17 18 19 20 21 22 23 24 25 26 27 28 29 30 31 32 33 34 35 36 37 38 39 40 41 42 43 44 45 46 47 | Public Sub QBFC_AddItemInvAssembly()
Dim SessionManager As QBSessionManager
Set SessionManager = New QBSessionManager
SessionManager.OpenConnection "", "IDN Add Item Inventory Assembly Sample"
SessionManager.BeginSession "", omDontCare
Dim requestMsgSet As IMsgSetRequest
Set requestMsgSet = SessionManager.CreateMsgSetRequest("US", 5, 0)
' Initialize the message set request's attributes
requestMsgSet.Attributes.OnError = roeStop
' Add the request to the message set request object
Dim ItemAssemblyAdd As IItemInventoryAssemblyAdd
Set ItemAssemblyAdd = requestMsgSet.AppendItemInventoryAssemblyAddRq
'Set the properties in the assembly object
ItemAssemblyAdd.Name.setValue ("Widget Y")
ItemAssemblyAdd.SalesTaxCodeRef.FullName.setValue ("Tax")
ItemAssemblyAdd.SalesDesc.setValue ("Misc Widgets")
ItemAssemblyAdd.SalesPrice.setValue (10#)
ItemAssemblyAdd.IncomeAccountRef.FullName.setValue ("Sales Income")
ItemAssemblyAdd.COGSAccountRef.FullName.setValue ("Cost of Goods Sold")
ItemAssemblyAdd.AssetAccountRef.FullName.setValue ("Inventory Asset")
ItemAssemblyAdd.BuildPoint.setValue (10)
Dim AssemblyLineItem As IItemInventoryAssemblyLine

'Append each line item of the component list separately. Append returns
'the line item object, which you then set with the values you want
Set AssemblyLineItem = ItemAssemblyAdd.ItemInventoryAssemblyLineList.Append
AssemblyLineItem.ItemInventoryRef.FullName.setValue ("Big Bolt")
AssemblyLineItem.Quantity.setValue (2)
Set AssemblyLineItem = ItemAssemblyAdd.ItemInventoryAssemblyLineList.Append
AssemblyLineItem.ItemInventoryRef.FullName.setValue ("Big Nut")
AssemblyLineItem.Quantity.setValue (2)
'Perform the request and obtain a response from QuickBooks
Dim responseMsgSet As IMsgSetResponse
Set responseMsgSet = SessionManager.DoRequests(requestMsgSet)
‘Show the results
MsgBox responseMsgSet.ToXMLString
‘Close the session and connection with QuickBooks.
SessionManager.EndSession
SessionManager.CloseConnection
End Sub
|
An assembly item, as mentioned earlier in this chapter can be edited at any time via the UI or the SDK, but any modifications to the assembly are not tracked. Accordingly, if you are making changes to the component list used, you may want to consider ways to make it easier to track the revision history yourself, perhaps by selling out of the existing stock first, or disassembling the existing assemblies before changing the component list.
The next example shows an ItemInventoryAssemblyMod request that changes the BuildPoint of the specified assembly item.
1 2 3 4 5 6 7 8 9 10 11 12 13 | <?xml version="1.0" ?> <?qbxml version="5.0"?> <QBXML> <QBXMLMsgsRq onError = "stopOnError"> <ItemInventoryAssemblyModRq requestID = "0"> <ItemInventoryAssemblyMod> <ListID>1B0000-1130277147</ListID> <EditSequence>1130433150</EditSequence> <BuildPoint>20</BuildPoint> </ItemInventoryAssemblyMod> </ItemInventoryAssemblyModRq> </QBXMLMsgsRq> </QBXML> |
The next example is a self-contained procedure that
- Opens a connection with QuickBooks
- Queries for all inactive and active assembly items that contain “Panel” in the FullName, and that were modified within the specified date range.
- Arbitrarily picks the first assembly item from the query and saves its ListID and edit sequence for the upcoming mod request
- Issues a mod request using the ListID and edit sequence obtained in the query, modifying the memo and the quantity
- Shows the results, and closes the connection.
Notice that the query specifies that only ListID and EditSequence (via IncludeRetElement) is to be returned in the response because that is all we need from the query.
1 2 3 4 5 6 7 8 9 10 11 12 13 14 15 16 17 18 19 20 21 22 23 24 25 26 27 28 29 30 31 32 33 34 35 36 37 38 39 40 41 42 43 44 45 46 47 48 49 50 51 52 53 54 55 56 57 58 59 60 61 62 | Public Sub QBFC_ModItemAssembly()
Dim SessionManager As QBSessionManager Set SessionManager = New QBSessionManager
SessionManager.OpenConnection "", "IDN Mod Item Assembly Sample" SessionManager.BeginSession "", omDontCare
Dim requestMsgSet As IMsgSetRequest
Set requestMsgSet = SessionManager.CreateMsgSetRequest("US", 5, 0)
'Initialize the message set request's attributes
requestMsgSet.Attributes.OnError = roeStop
‘First we query QB for active and intactive assemblies within
‘a date range with the fullname containing “Panel”
Dim ItemAssmblyQuery As IItemInventoryAssemblyQuery
Set ItemAssmblyQuery = requestMsgSet.AppendItemInventoryAssemblyQueryRq
ItemAssmblyQuery.IncludeRetElementList.Add ("EditSequence")
ItemAssmblyQuery.IncludeRetElementList.Add ("ListID")
ItemAssmblyQuery.ORListQuery.ListFilter.ActiveStatus.setValue (asAll)
ItemAssmblyQuery.ORListQuery.ListFilter.FromModifiedDate.setValue "2005-10-01", True
ItemAssmblyQuery.ORListQuery.ListFilter.ToModifiedDate.setValue "2005-10-27", True
ItemAssmblyQuery.ORListQuery.ListFilter.ORNameFilter.NameFilter.MatchCriterion.setValue (mcContains)
ItemAssmblyQuery.ORListQuery.ListFilter.ORNameFilter.NameFilter.Name.setValue ("Panel")
Dim responseMsgSet As IMsgSetResponse
Set responseMsgSet = SessionManager.DoRequests(requestMsgSet)
Dim response As IResponse
'Response list contains one response, because we made one request Set response = responseMsgSet.ResponseList.GetAt(0)
'make sure there is data first
If response.Detail Is Nothing
Then MsgBox "No Detail available" Exit Sub
End If
'This is a query, so the Detail is a ret list
Dim ItemAssmblyRetList As IItemInventoryAssemblyRetList
Dim ItemAssmblyRet As IItemInventoryAssemblyRet
Set ItemAssmblyRetList = response.Detail
'Potentially many assemblies in the retlist: we get the first one
'for convenience: you'll do something smarter or let the user pick Set
ItemAssmblyRet = ItemAssmblyRetList.GetAt(0)
'Save the ListID and EditSequence: we need them for our mod request
Dim ListID As String
Dim EditSeq As String
ListID = ItemAssmblyRet.ListID.getValue EditSeq = ItemAssmblyRet.EditSequence.getValue
‘Clear out the message set so we can re-stuff it with our mod request
requestMsgSet.ClearRequests
'Add the request to the message set request object Dim ItemAssmblyMod As IItemInventoryAssemblyMod
Set ItemAssmblyMod = requestMsgSet.AppendItemInventoryAssemblyModRq
'Set the properties in the BuildAssembly mod object ItemAssmblyMod.ListID.setValue (ListID)
ItemAssmblyMod.EditSequence.setValue (EditSeq)
ItemAssmblyMod.BuildPoint.setValue (20)
'Perform the request and obtain a response from QuickBooks Set responseMsgSet = SessionManager.DoRequests(requestMsgSet)
MsgBox responseMsgSet.ToXMLString
'Close the session and connection with QuickBooks. SessionManager.EndSession SessionManager.CloseConnection
End Sub
|
The following figure shows the query filters you can use. If you’re familiar with SDK queries, there is nothing special or tricky about this particular query. If you’re not familiar with SDK queries, you might want to take a quick look at Query requests and responses, which provides general information on queries, such as using iterators for large query returns, using IncludeRetElement to get only the data you need, using various types of filters, and so on.
The ActiveStatus filter is useful if you need to make your query retrieve any inactive assembly items. (By default only active items are returned in the query.) Specify the value “All” to get all assemblies, both active or inactive, or “InactiveOnly” to get only inactive items.

The next example shows constructing an ItemInventoryAssemblyQuery Request in qbXML that queries for all active and inactive item assemblies that contain the name “Panel”, and also that were last modified in the specified date range,
1 2 3 4 5 6 7 8 9 10 11 12 13 14 15 | <?xml version="1.0" ?> <?qbxml version="5.0"?> <QBXML> <QBXMLMsgsRq onError = "stopOnError"> <ItemInventoryAssemblyQueryRq requestID = "0"> <ActiveStatus>All</ActiveStatus> <FromModifiedDate>2005-10-01</FromModifiedDate> <ToModifiedDate>2005-10-27</ToModifiedDate> <NameFilter> <MatchCriterion>Contains</MatchCriterion> <Name>Panel</Name> </NameFilter> </ItemInventoryAssemblyQueryRq> </QBXMLMsgsRq> </QBXML> |
See Modifying an existing inventory assembly item, above.
The next example shows a typical qbXML for building an assembly. The example shows all of the possible tags used.
1 2 3 4 5 6 7 8 9 10 11 12 13 14 15 | <?qbxml version="5.0"?> <QBXML> <QBXMLMsgsRq onError="continueOnError"> <BuildAssemblyAddRq> <BuildAssemblyAdd> <ItemInventoryAssemblyRef> <FullName>Metal Panel Assembly</FullName> </ItemInventoryAssemblyRef> <TxnDate>2005-10-26</TxnDate> <Memo>Built from component list 1</Memo> <QuantityToBuild>2</QuantityToBuild> </BuildAssemblyAdd> </BuildAssemblyAddRq> </QBXMLMsgsRq> </QBXML> |
The API Reference page for BuildAssemblyAddRq:

Notice that you can perform a build of only one assembly item per BuildAssemblyAddRq, as indicated in the figure above.An excerpt from the response is shown below:
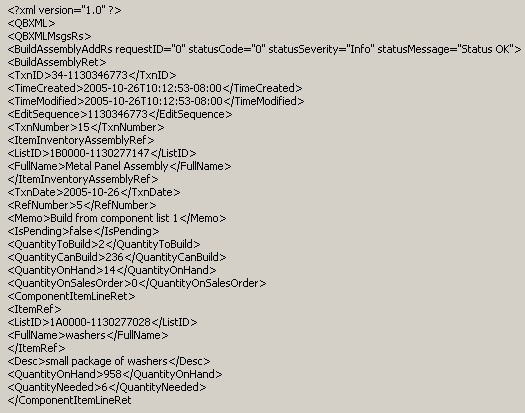
Notice that the response contains the component list showing all the inventory items and assemblies, along with the quantities used in the built assembly transaction. Notice also that the IsPending field is set to False. It will always be False when you do a BuildAssemblyAdd because pending builds are not supported in this request.
Finally, notice the various Quantity fields: QuantityToBuild (what you just built in the BuildAssemblyAdd request), QuantityCanBuild (the max number that you could build of this assembly), QuantityOnHand, and QuantityOnSalesOrder. These last two quantities are important for determining how many assembly units are actually available: you subtract the on-sales order quantity from the on-hand quantity to get the number of units that are actually available, with all quantities snapshotted as of the TxnDate specified in the request.
The following example shows a complete self-contained procedure that opens a connection with QuickBooks, builds the specified assembly item in the currently open company, shows the results, and closes the connection. The sample accepts the default ref number that will be assigned by QuickBooks, but specifies the build date.
1 2 3 4 5 6 7 8 9 10 11 12 13 14 15 16 17 18 19 20 21 22 23 24 25 26 27 28 29 30 | Public Sub QBFC_AddBuildAssembly()
Dim SessionManager As QBSessionManager
Set SessionManager = New QBSessionManager
SessionManager.OpenConnection "", "IDN Add Build Assembly Sample"
SessionManager.BeginSession "", omDontCare
Dim requestMsgSet As IMsgSetRequest
Set requestMsgSet = SessionManager.CreateMsgSetRequest("US", 5, 0)
' Initialize the message set request's attributes
requestMsgSet.Attributes.OnError = roeStop
' Add the request to the message set request object
Dim BuildAssmblyAdd As IBuildAssemblyAdd
Set BuildAssmblyAdd = requestMsgSet.AppendBuildAssemblyAddRq
'Set the properties in the BuildAssembly add object
BuildAssmblyAdd.ItemInventoryAssemblyRef.FullName.setValue ("Metal Panel Assembly")
BuildAssmblyAdd.TxnDate.setValue ("2005-10-26")
BuildAssmblyAdd.Memo.setValue ("Build from component list 1")
BuildAssmblyAdd.QuantityToBuild.setValue (2)
'Perform the request and obtain a response from QuickBooks
Dim responseMsgSet As IMsgSetResponse
Set responseMsgSet = SessionManager.DoRequests(requestMsgSet)
MsgBox responseMsgSet.ToXMLString
'Close the session and connection with QuickBooks.
SessionManager.EndSession
SessionManager.CloseConnection
End Sub
|
The API Reference excerpt below shows the available modifications you can make to a BuildAssembly transaction:

Notice that along with TxnID, every BuildAssemblyMod requires the edit sequence, which prevents accidental overwrites to data by ensuring you are saving the most recent version of the data. This means that before modifying any existing BuildAssembly transaction, you must first do a BuildAssemblyQuery–even if you already have the TxnID–to get the current EditSequence.
Note
Note
You’ll also want to check for status code 3200 in the response to your mod request. This code indicates that someone has modified the transaction since you last retrieved the transaction from QuickBooks. You’ll have to re-retrieve that transaction and apply your mods to that newer version.
If the transaction is pending, you can remove the pending status, effectively performing the build. This mod will work in the SDK only if there are sufficient components for the build on the TxnDate.
Any fields not explicitly modified in the BuildAssemblyMod request keep their existing values.
The next example shows a BuildAssemblyMod request that sets new values for the Memo and QuantityToBuild fields. The edit sequence was obtained from a previous BuildAssemblyQuery.
1 2 3 4 5 6 7 8 9 10 11 12 13 | <?qbxml version="5.0"?> <QBXML> <QBXMLMsgsRq onError="continueOnError"> <BuildAssemblyModRq> <BuildAssemblyMod> <TxnID>25-1130282678</TxnID> <EditSequence>1130282678</EditSequence> <Memo>Built from component list 2</Memo> <QuantityToBuild>4</QuantityToBuild> </BuildAssemblyMod> </BuildAssemblyModRq> </QBXMLMsgsRq> </QBXML> |
The next example shows a self-contained procedure that
- Opens a connection with QuickBooks
- Queries for build assembly transactions that fall within the specified date range
- Arbitrarily picks the first transaction from the query and saves its TxnID and edit sequence for the upcoming mod request
- Issues a mod request using the TxnID and edit sequence obtained in the query, modifying the memo and the quantity
- Shows the results, and closes the connection.
Notice that the query specifies that only TxnID and EditSequence (via IncludeRetElement) is to be returned in the response because that is all we need from the query.
1 2 3 4 5 6 7 8 9 10 11 12 13 14 15 16 17 18 19 20 21 22 23 24 25 26 27 28 29 30 31 32 33 34 35 36 37 38 39 40 41 42 43 44 45 46 47 48 49 50 51 52 53 54 55 56 57 58 59 60 61 62 63 64 65 66 | Dim SessionManager As QBSessionManager
Set SessionManager = New QBSessionManager
SessionManager.OpenConnection "", "IDN Mod Build Assembly Sample"
SessionManager.BeginSession "", omDontCare
Dim requestMsgSet As IMsgSetRequest
Set requestMsgSet = SessionManager.CreateMsgSetRequest("US", 5, 0)
' Initialize the message set request's attributes
requestMsgSet.Attributes.OnError = roeStop
'First we query QB for build assembly transactions within a date range
Dim BuildAssmblyQuery As IBuildAssemblyQuery
Set BuildAssmblyQuery = requestMsgSet.AppendBuildAssemblyQueryRq
BuildAssmblyQuery.IncludeRetElementList.Add ("EditSequence")
BuildAssmblyQuery.IncludeRetElementList.Add ("TxnID")
BuildAssmblyQuery.ORBuildAssemblyQuery.BuildAssemblyFilter.ORDateRangeFilter.TxnDateRangeFilter.ORTxnDateRangeFilter.TxnDateFilter.FromTxnDate.setValue ("2005-10-25")
BuildAssmblyQuery.ORBuildAssemblyQuery.BuildAssemblyFilter.ORDateRangeFilter.TxnDateRangeFilter.ORTxnDateRangeFilter. xnDateFilter.ToTxnDate.setValue ("2005-10-26")
Dim responseMsgSet As IMsgSetResponse
Set responseMsgSet = SessionManager.DoRequests(requestMsgSet)
Dim response As IResponse
' Responselist contains one response, because we made one request
Set response = responseMsgSet.ResponseList.GetAt(0)
'Make sure there is data first
If response.Detail Is Nothing
Then
MsgBox "No Detail available"
Exit Sub
End If
'This is a query, so the response detail is a ret list
Dim BuildAssemblyRetList As IBuildAssemblyRetList
Dim BuildAssemblyRet As IBuildAssemblyRet
Set BuildAssemblyRetList = response.Detail
'Potentially many transactions in the retlist: we get the first one
'for our convenience: you'll do something smarter or let the user pick
Set BuildAssemblyRet = BuildAssemblyRetList.GetAt(0)
'Save the TxnID and EditSequence: we need 'em for our mod request Dim TransID As String
Dim EditSeq As String
TransID = BuildAssemblyRet.TxnID.getValue
EditSeq = BuildAssemblyRet.EditSequence.getValue
‘clear the message set so we can re-stuff it with the mod request
requestMsgSet.ClearRequests
‘Add the request to the message set request object
Dim BuildAssmblyMod As IBuildAssemblyMod
Set BuildAssmblyMod = requestMsgSet.AppendBuildAssemblyModRq
'Set the properties in the BuildAssembly mod object
BuildAssmblyMod.TxnID.setValue (TransID)
BuildAssmblyMod.EditSequence.setValue (EditSeq)
BuildAssmblyMod.TxnDate.setValue ("2005-10-25")
BuildAssmblyMod.Memo.setValue ("Build from component list 4")
BuildAssmblyMod.QuantityToBuild.setValue (5)
'Perform the request and obtain a response from QuickBooks
Set responseMsgSet = SessionManager.DoRequests(requestMsgSet)
MsgBox responseMsgSet.ToXMLString
'Close the session and connection with QuickBooks.
SessionManager.EndSession
SessionManager.CloseConnection
End Sub
|
The BuildAssemblyQuery request provides functionality similar to the functionality found in the UI advanced Find feature, which is accessed by selecting (from the main QuickBooks menu bar) Edit->Find->Advanced Find.
If you are familiar with QuickBooks queries in general, there is nothing tricky or special about this one. Notice however, that by default the component line items are included with each returned build assembly transaction.
The next example shows a simple example of constructing a BuildAssemblyQuery query in qbXML that queries for BuildAssembly transactions that were builds of the specified assembly item, that were built with the date range specified and that are currently not pending. For more information on building queries, including using iterators to manage large query returns, see Query requests and responses.
1 2 3 4 5 6 7 8 9 10 11 12 13 14 15 16 | <?xml version="1.0" ?> <?qbxml version="5.0"?> <QBXML> <QBXMLMsgsRq onError = "stopOnError"> <BuildAssemblyQueryRq requestID = "0"> <TxnDateRangeFilter> <FromTxnDate>2005-10-26</FromTxnDate> <ToTxnDate>2005-10-26</ToTxnDate> </TxnDateRangeFilter> <ItemFilter> <FullName>Metal Panel Assembly</FullName> </ItemFilter> <PendingStatus>NotPendingOnly</PendingStatus> </BuildAssemblyQueryRq> </QBXMLMsgsRq> </QBXML> |
We’ve already shown an example of constructing a BuildAssemblyQuery and processing some of its response data.
You can use the SDK’s CustomSummaryReportQuery or CustomDetailReportQuery to get BuildAssembly and item assembly reports. To get BuildAssembly reports, use the ReportTxnTypeFilter with the TxnFilter set to BuildAssembly. To get assembly item reports, use the ReportItemFilter with the ItemTypeFilter set to InventoryAndAssembly