Using bill rates for time
Billing rates (called billing rate levels in the UI, but simply billing rates in this document) are used in certain QuickBooks editions to allow you to charge different rates for a service item based on who does the work (employee, or vendor, or other name).This feature supports scenarios such as allowing you to bill at different rates for employees performing the same service but with different experience levels. Another scenario supported is the ability to charge different rates for employees based on the difficulty of a task.
This page describes the use of billing rates first from the perspective of the QuickBooks UI, to show the workflow that is supported by this feature, and any limitations of the feature when exercised by the SDK requests. This page also shows you how to build the BillingRateAdd request in qbXML and in QBFC.
A billing rate is a custom price that overrides the standard price set for a service item, based on the entity that does the work (employee, vendor, or other name). The billing rate is attached to the entity and is in effect when that entity is assigned to a time transaction.
There are two ways that this rate override works. You can set up a billing rate to do a simple override of all service item rates by imposing a fixed rate that will override all the standard rates. Or, you can set up the billing rate to overide specific service items (one or more) by a fixed amount or percentage.
Note
Note
The kind of rate you have on the service item determines the kind of billing rate you may have on that item. That is, if you attempt to set the Billing Rate to a percentage for a service item that has an amount for the Rate, you will get an error.
The billing rates feature is currently available only in certain flavors of QuickBooks Premier and Enterprise:
- Contractor
- Professional Services
- Accountant
One key limitation of the SDK’s support of the billing rates feature is that you cannot automate the insertion of billable time charges directly into invoices via QB SDK requests. Only the QuickBooks interactive user can do that because it entails choosing charges from a list of outstanding customer charges at the time of invoice creation, and the company owner (the QuickBooks interactive user) must remain in control of this.
Another limitation in the SDK is that you can assign Billing Rates only to employees and vendors, whereas in the UI, you can assign Billing Rates to employees, vendors, and other names.
It is possible for a customer to have a price level that changes the standard rate assigned to a service item. What happens when you have billable time against that customer using the same service item and you also have a billing rate that applies to that service item? In the case where there is both a customer price level and a billing rate operating on a service item price, the price level always “wins”. Only the price level is used in this case.
This section reviews the workflow for billing rates in the QuickBooks UI as a guide to the sequence and content of SDK requests for the same workflow. The core transaction in the billing rate workflow is the time tracking transaction because that is where the billable time charges are recorded against the customer. From the UI perspective, this transaction is recorded via the Weekly Timesheet form or the Time/Enter Single Activity form in the UI. The easiest way to arrive at these forms is to click on the Enter Time icon in the QuickBooks Home page navigator. (In the SDK, you use the TimeTrackAdd request.) The following figure shows the Time/Enter SingleActivity form.

The time transaction, not surprisingly, tracks time duration of billable and unbillable activities within the specified timeframe. In the time transaction, you specify the customer, the time duration, the service item that identifies the type of activity performed, the entity that did the work (employee, vendor, or other name), and so forth as shown in the items circled in the figure above. Notice that you can choose to make the time billable or not.
Note
Note
NOTE: One scenario where you would not make the time billable would be if you were tracking vendor time but were passing the vendor’s time bills directly to the customer: in this case you wouldn’t want to make the time billable as that would result in double billing.
Keeping this in mind, the billing rate workflow is as follows:
- Create one or more service items with a standard price/rate for the task(s) for which you want to bill time.
- Create billing rates that express the pricing structure you want to apply to those service items. (A billing rate is always linked to a service item.)
- Assign the billing rates as desired to your employees, vendors, and/or other names.
- Track the time in a time transaction (single activity form or weekly timesheet form). This transaction specifies the customer to be billed, the service item, the entity doing the work.
- Invoice the customer for the billable time charges, selecting from the list of the customer’s billable time charges when prompted.
We’ll cover each of these aspects of the workflow in more detail in the following sections.
A service item is an item on the item list. You can get to the new item form from the main QuickBooks pulldown menu, Lists->Item List->Item->New. Select Service as the item type as shown in below:

The Rate field shows the value that will be impacted by the billing rate, when it is applied in the time transaction. Notice that you must assign an income account to the service item.
Also, notice the checkbox labeled “This service is used in…or is performed by a subcontractor.” You check this if you are creating a service item for work to be performed by a vendor. The next figure shows the additional fields you need to supply for vendor service items.

In this usage, in addition to the income account used for the money coming in as a result of the service item, you need to specify an expense account, which is used for the money going out to the vendor to pay for that work.
In the UI, you can open the billing rate form from the main QuickBooks menu bar: Lists-> Billing Rate Level List-> Billing Rate Level. The form is shown below:
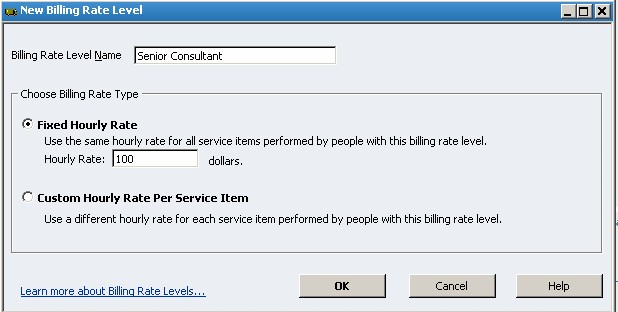
In the form we selected a fixed hourly rate. This means that whoever has this billing rate assigned, employee, vendor, or other name, that fixed rate will override any service item rate used in the billable time transaction.
If you wanted to override a smaller subset of the service items, you would choose the second option: Custom Hourly Rate per Service Item, shown below:

Notice that you can select one or more service items in the list. Also, notice that you can specify a fixed rate for each service item (overriding the standard rate) by entering values in the Billing Rate column, as shown in the figure.
What if you wanted to charge a percentage higher or lower than the standard rate? To do that, you would click Adjust Selected Rates and specify the desired adjust higher or lower:

A billing rate takes effect only if it is assigned to an entity involved in a billable time transaction. Assigning the billing rate works similarly for employees, vendors, and other names, so we’ll only describe the employee, to keep our story short. (Again, remember that in the SDK, you won’t be able to assign billing rates to an Other Name entity.)
To assign a billing rate, open the Employee form. You get there by clicking on the Employee center icon, then clicking on an existing employee name or clicking on the New Employee button, if you are adding a new employee. The form looks like this (once you click on the Additional Info tab, which is where you assign a billing rate):

Notice that you can assign only one billing rate to an entity.
The only way billing rates take effect is in a billable time transaction. However, the heading to this section is a bit of a misnomer because you don’t directly use billing rates in a time transaction. Instead, they are applied indirectly, by specifying the entity doing the billable time (e.g., employee, vendor) and by specifying the service item.
In the UI, you can enter time either in a weekly timesheet, or in the single activity form shown below:

The Name field in the figure above is the entity doing the work. You can select a name from the list. (By the way, only employees, vendors, and other names are on that list.) If the entity name you select has a billing rate assigned, it will be applied to the service item specified in the transaction in the Service Item field. Checking the Billable checkbox means the transaction will result in time charges for the customer specified in the customer:job field.
For the sake of completeness, we’ll cover the invoicing process here, where billable time charges are added to a customer invoice. There is currently no way to use the SDK to insert billable time charges into an invoice.
During invoice creation, when you specify a customer you are prompted to include any outstanding time charges:

If you accept the prompt to add the charges, you see a list of outstanding billable charges:

You simply select as many of the charges as you want: each will become a separate line item in the invoice. Notice that the rate that appears in the invoice Rate column is the standard service item charge if no billing rates are in effect for a billable charge, and the billing rate charge if billing rates apply. (That is, if the entity performing the billable time had a billing rate assigned.)
The same workflow, excepting the invoicing of customers for billable time, can be implemented with the SDK.
In the SDK, you would simply use the ItemServiceAdd request, whose fields are listed in the API Reference as shown below:

Notice that to fill out a service item for employees, you would use the SalesOrPurchase aggregate, whereas you’d use the SalesAndPurchase aggregate to specify a service item to be performed by a vendor.
The following qbXML request adds a service item with the name “Pump repair” and a rate of 50.
1 2 3 4 5 6 7 8 9 10 11 12 13 14 15 16 | <qbxml> <qbxmlmsgsrq onerror="stopOnError"> <itemserviceaddrq requestid="0"> <itemserviceadd> <name>Pump Repair</name> <salesorpurchase> <desc>repair small pumps</desc> <price>50.00</price> <accountref> <fullname>Service Income</fullname> </accountref> </salesorpurchase> </itemserviceadd> </itemserviceaddrq> </qbxmlmsgsrq> </qbxml> |
The following VB code adds the same service item as the above qbXML snippet. Notice the use of ORSalesPurchase.SalesOrPurchase. If we wanted this service item to be used by vendors we would have used ORSalesPurchase.SalesAndPurchase.
1 2 3 4 5 6 7 8 9 10 11 12 13 14 15 | Dim SessionManager As QBSessionManager Set SessionManager = New QBSessionManager SessionManager.OpenConnection "", "IDN ItemService Add Sample" SessionManager.BeginSession "", omDontCare Dim ItemServiceAddSet As IMsgSetRequest Set ItemServiceAddSet = SessionManager.CreateMsgSetRequest("US", 6, 0) Dim ServiceItemAdder As IItemServiceAdd Set ServiceItemAdder = ItemServiceAddSet.AppendItemServiceAddRq ServiceItemAdder.Name.setValue "Pump Repair" ServiceItemAdder.ORSalesPurchase.SalesOrPurchase.Desc.setValue "repair small pumps" ServiceItemAdder.ORSalesPurchase.SalesOrPurchase.ORPrice.Price.setValue 50 ServiceItemAdder.ORSalesPurchase.SalesOrPurchase.AccountRef.FullName.setValue "Service Income" Dim ItemServiceAddResp As IMsgSetResponse Set ItemServiceAddResp = SessionManager.DoRequests(ItemServiceAddSet) SessionManager.EndSession SessionManager.CloseConnection |
The follow two examples show how to add Billing Rates using the BillingRateAdd request.
The following qbXML builds a billing rate called “Junior Level” which applies to the “Pump Repair” service item. The billing rate is applied to the standard rate, giving a 50% discount to the standard rate. Notice that to obtain a lower rate than the standard, you specify a negative number in the AdjustPercentage field: -50 means 50% lower than the standard rate. A value of 50 would mean 50% higher.
1 2 3 4 5 6 7 8 9 10 11 12 13 14 15 16 | <qbxml> <qbxmlmsgsrq onerror="stopOnError"> <billingrateaddrq requestid="0"> <billingrateadd> <name>Junior Consultant Level</name> <billingrateperitem> <itemref> <fullname>Pump Repair</fullname> </itemref> <adjustpercentage>-50.0</adjustpercentage> <adjustbillingraterelativeto>StandardRate</adjustbillingraterelativeto> </billingrateperitem> </billingrateadd> </billingrateaddrq> </qbxmlmsgsrq> </qbxml> |
The following VB sample is a one-shot program that does the same thing as the qbXML sample above, building a billing rate called “Junior Level” that applies to the “Pump Repair” service item.
Again, notice the billing rate is applied to the standard rate, giving a 50% discount to the standard rate because it is a negative number in the AdjustPercentage field. To specify a higher rate than the standard, you would specify a positive number in the AdjustPercentage field.
1 2 3 4 5 6 7 8 9 10 11 12 13 14 15 16 17 | Dim SessionManager As QBSessionManager Set SessionManager = New QBSessionManager SessionManager.OpenConnection "", "IDN BillingRate Add Sample" SessionManager.BeginSession "", omDontCare Dim BillingRateAddSet As IMsgSetRequest Set BillingRateAddSet = SessionManager.CreateMsgSetRequest("US", 6, 0) Dim BillingRateAdder As IBillingRateAdd Set BillingRateAdder = BillingRateAddSet.AppendBillingRateAddRq BillingRateAdder.Name.setValue "Junior Consultant Level" Dim MyItem As IBillingRatePerItem Set MyItem = BillingRateAdder.ORBillingRate.BillingRatePerItemList.Append() MyItem.ItemRef.FullName.setValue "Pump Repair" MyItem.ORBillingRateItem.BillingRateAdjustment.AdjustBillingRateRelativeTo.setValue abrrtStandardRate MyItem.ORBillingRateItem.BillingRateAdjustment.AdjustPercentage.setValue -50 Dim BillingRateAddResp As IMsgSetResponse Set BillingRateAddResp = SessionManager.DoRequests(BillingRateAddSet) SessionManager.EndSession SessionManager.CloseConnection |
In the SDK, you can assign a billing rate to an employee or vendor in the EmployeeAdd, EmployeeMod, VendorAdd, and VendorMod requests. You simply use a BillingRateRef aggregate in those requests to add the billing rate. You can add only one billing rate per entity. We won’t bother with sample code here because of its simplicity. Take a look at the API Reference for details on building Employee or Vendor requests.
In the SDK, you use the TimeTxnAdd/TimeTxnMod requests, which are more like the single activity form. Time Transactions are described in another page, so we won’t cover any SDK details here.